Content
The technology of planting thuja in the fall with a step-by-step description is the necessary information for beginners who want to save a tree in winter. Experienced people already know what to do and how to do it. When planting new types of plants in your area, you first need to study the needs of the plant and methods of care theoretically.
What a tree
Rod tui has 5 types:
- Korean
- folded / giant;
- Japanese / standish;
- western;
- Sichuan.
Korean thuja in the climate of Russia can only grow in a greenhouse. It is not used to decorate outdoor gardens.
Sichuan thuja is an endangered endemic to China. The plant is very rare and is not used for ornamental plantings.
Folded thuja
The folded thuja has an additional name: red cedar. Often the definition of "Canadian" or "Western" is added to this name. This is a powerful tree. At the borders of the range in unfavorable conditions, folded thuja grows in a shrub form.
The folded thuja is cultivated as an ornamental tree in parks and gardens. For decorative purposes, three forms of this type are used:
- with dark green needles;
- with a "weeping" crown;
- with a cylindrical crown.
Propagate this tree by seed.

Japanese thuja
Under natural conditions it grows up to 18 m. The crown is cone-shaped, loose. With candelabra branches. At home, thuja is grown for the sake of wood. In Europe, they are used for decorative purposes.
Western thuja
Native to North America. It is a frost-hardy plant that can withstand cold temperatures down to -36 ° C. In parks, squares, in summer cottages, it is planted because of its decorative appearance.
Western thuja propagates by green cuttings and seeds. For germination, seeds require mandatory stratification. The time at which you need to plant thuja depends on the breeding method.
When to plant thuja: fall or spring
Thuja can be planted both in autumn and spring. If you plan to plant seeds, it must be borne in mind that "spring" seeds will not germinate without preliminary stratification for several months. To avoid unnecessary labor costs, the seeds must be planted in the fall. In winter, they will undergo natural stratification and germinate in spring.
It is better to plant seedlings in the fall, but so that they have time to take root. The option of planting in the spring is possible, but then the first year the tree will be very difficult to endure. Some spring seedlings die.
With cuttings, a rather difficult question. Although western thuja can reproduce in this way, not all cuttings take root. Like seedlings, cuttings planted in a permanent place need time to root.
Dates of planting thuja in the fall
Seeds can be planted in the fall at almost any time. If necessary, they can be "planted" in the frozen ground in winter.But then there may not be enough time for stratification.
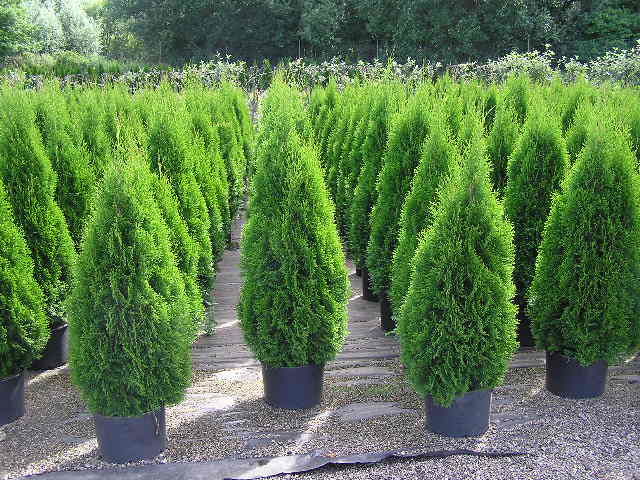
But the plants were grown indoors, and not in the country. A couple of years later, the question arose of what to do with the trees if no one needed all these twigs.
Saplings and cuttings that have taken root must be planted so that the thuja have time to take root before frost. In the southern regions, it is advised to plant thuja in autumn in October. You can plant trees in mid-October. In the northern regions, it is better not to rely on the frost resistance of thujas, but to plant them early: at the end of August or in September.
Is it possible to plant thuja in October, in November
In the southern regions, October is the main and most favorable time for planting tui. In November, even in the south, it can be planted only if a positive temperature is promised until January.
In northern latitudes, frosts in the fall are already in October. In such regions, it is better to plant thuja at the very beginning of autumn or at the end of summer.
How to plant thuja in autumn
In autumn, thuja is planted in exactly the same way as in spring. That is, they dig a hole of the appropriate size, fill it with harvested soil, and then plant a plant. The choice of the landing site is much more important. Although here there are no differences between autumn and spring. After all, thuja are planted for more than one year.
The only difference is watering. In the spring, the thuja begins to grow and requires fairly frequent watering. In the fall, the trees will most likely not need to be watered at all. This function will be performed by rains.
Site selection and soil preparation
In the conditions of growing thuja, there are interesting "but":
- moisture-loving, but tolerates drought well;
- shade-tolerant, but prefers the sun;
- undemanding to the structure of the soil, but prefers fertile or medium;
- at home it is a calcephile, that is, it needs a large amount of lime in the soil;
- does not tolerate salinity;
- requires a lot of nitrogen.
Taking these features into account, a place for a thuja and a soil mixture are chosen.
The depth of the roots of an adult tree is at least 76 cm. When choosing a place, you need to make sure that the groundwater will be lower during spring floods. Otherwise, there is a risk of root rot.
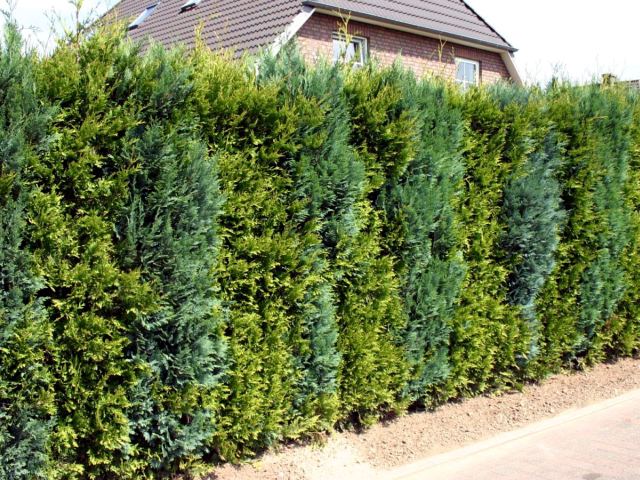
A place for a thuja is chosen well-lit by the sun, but with the expectation that for several hours a day it is in the shade. A decorative hedge is often made from thujas, and in this case the trees cover each other from the sun.
Priming
When preparing the soil for planting thuja, you need not only to take care of its fertility, but also to add those substances that the tree especially needs: chalk and nitrogen.
The soil taken out of the pit is mixed with peat, black earth or humus. If the soil is clayey, you can add sand. Chalk and ash are added to the mixture.
Preparation of seedlings
If it is planned to plant seedlings purchased from a store with a lump of earth, then their preparation consists in shaking them out of the pot and placing them in a prepared hole.
From hands, trees are sold without soil. And in this case, young thujas are carefully examined. All rotten roots and dried branches are cut off. Since the root system of the tree could dry out during the sale, the thuja is placed in a growth stimulator of the root system. The plant is kept in solution for 12 hours. Only then will the tree be ready for planting.
Preparing cuttings
It is not recommended to propagate thuja in spring and summer. The cuttings do not take root. The cuttings are rooted in the fall. Harvesting thuja cuttings has its own characteristics:
- for rooting, take either 2-3-year-old lignified shoots, or young lateral 50 cm long;
- a prerequisite is the presence of a "heel".
By "heel" is meant a piece of old wood that broke off along with the shoot. The "heel" is obtained either by cutting it out with a knife along with the shoot, or by abruptly breaking off the branch so that it breaks along with a piece of the mother tree.
It is believed that rooting in water is ineffective because there are few nutrients. For this reason, many gardeners prefer to root thuja directly in flower pots. A stalk rooted in a pot is later planted in the same way as a seedling.
How to plant thuja in the fall
Sowing seeds does not require much labor, but then you will have to feed the growing tree more intensively than the seedling planted in the prepared soil.
Thuja seeds are small. By autumn, holes are prepared, about 20 cm deep and filled with a fertile mixture. The seeds are buried to a depth of no more than a centimeter. Since the seeds should germinate only in the spring, they do not even need to be watered. With the beginning of spring and the melting of the snow, they will receive enough moisture.
But the disadvantage of this method is that thuja grows from seeds very slowly. But the gardener will receive a tree that is well adapted to the conditions on his site.
From the point of view of convenience, it is easier to buy a grown seedling. The rules for planting thuja in the fall are the same as for other trees.
Prepared soil is poured into a dug hole with a diameter of 1 m and a depth of at least 70 cm so that a seedling with a lump of earth can be placed on top.
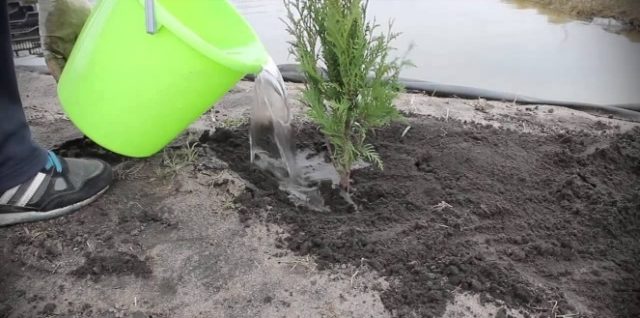
After that, soil is poured into the pit, completely closing the root system. It is impossible to immerse the root collar in the soil, the thuja will rot. The soil is lightly tamped and watered well.
When planting, you need to remember that after watering and wintering, the soil will sag. In the spring, a depression forms around the thuja. It may also turn out that the root collar will be above the ground level. In this case, you need to fill up the soil.
When planting a seedling with a "bare" root system, the technique is different:
- soil is poured into the bottom of the pit;
- thuja is placed on top of the resulting cone, spreading its roots so that they "entwine" the earth;
- fill up the soil until the pit is completely filled, making sure not to close the root collar;
- tamp the earth and water the thuja.
Since planting is more often carried out in the fall, later preparation of the thuja for winter will be required.
Thuja care in autumn
Watering in the fall is needed if the year is dry and there is little rain. With an abundance of rains, the thuja is not watered in autumn. The only exception is pre-winter watering in order to saturate the soil around as much as possible.
Thuja is a tree that you can not be afraid to overfeed with nitrogen in preparation for winter. This is an ornamental plant, and the more it “fattens”, the more beautiful it looks. In addition, thuja needs nitrogen even more than fruit trees. Of course, you don't need to dump the bag of urea under the barrel either. But if you pour a glass of ash on the trunk circle, there will be no harm to the thuja.
Thuja pruning can be carried out at any time of the year. Evergreens don't care. Since the varieties of thuja have already been bred, having a spherical, conical or cylindrical shape. Therefore, in most cases, crown pruning is not required.
In thuja, only sanitary pruning is usually done, removing yellowed and diseased branches. The only exception is the spherical variety of thuja. This plant has to be "combed", as sometimes young shoots start to protrude from the ball and the crown becomes untidy.
In winter, pruning is not carried out only because of the very low temperatures.
How to prepare thuja for winter
Since thuja is a frost-resistant plant, it may seem that it is not necessary to cover it for the winter. But a small thuja can even freeze in winter. Especially if it is a sprout that is not even a year old. Larger thuja should be covered for the winter so that they do not get burned or break under the weight of the snow. It is better to cover not only the trunk and crown, but also the root system. But before that, the autumn work must be completed.
Pre-winter watering and feeding
Water-charging irrigation is carried out according to the standard scheme. The maximum dose of water is required if the soil crumbles during soil sampling. The full norm for an adult tree is 100-140 liters of water per m³.For a thuja less than a meter high, 30-40 liters of water per m³ will be required.
Top dressing from ash and chalk is poured into the root circle after irrigation and before mulching. Then everything is carefully dug to a depth of no more than 10 cm. Instead of natural fertilizers, you can use store-bought complex fertilizers.
Mulching
Sometimes moisture-charging irrigation in the fall does not save the roots from freezing. If the winter is snowless, moisture from the soil quickly "freezes". In this case, the thuja may die.
Mulch not only protects the roots from freezing in winter, but also can serve as fertilizer in spring. For mulch use:
- humus;
- peat;
- straw;
- sawdust;
- fallen leaves.
The covering material is laid out in a layer 10-30 cm thick. If the region usually has very cold winters, spruce branches are placed on top of the mulch. In the spring, spruce branches are removed, humus and peat can be left. It is better to remove the rest of the mulching material. Leaves, sawdust and straw decompose slowly and pests can grow under them.
Do I need to cover thuja for the winter
Although thuja is a winter-hardy plant, it has another problem: in late winter and early spring, the tree can get sunburn. In southern latitudes, a tree can generally get these burns in any winter month, since in the south, frosts often alternate with strong thaws.
And it also happens that immediately after the rain, the air cools sharply, and ice forms on the branches of the trees. It works like a lens that focuses the sun's rays. Even at temperatures of -20 ° C, burns can occur under the ice.
For lignified branches, the burn is unpleasant, but not critical. For tui, everything is worse. If you do not cover the thuja for the winter, such ice lenses can "burn out" almost all the foliage.
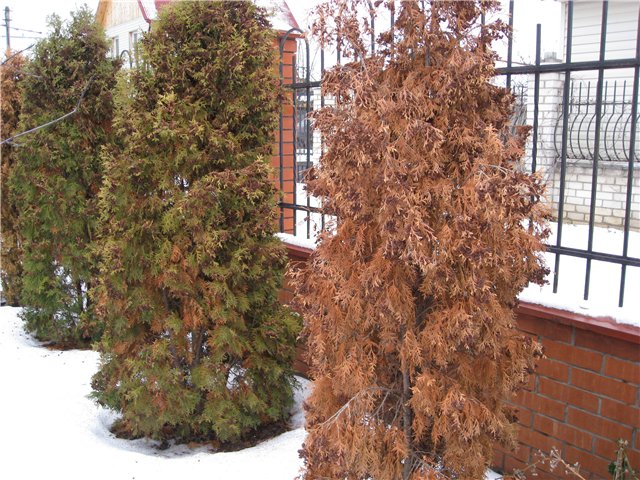
If there was heavy snowfall with "wet" snow that sticks to surfaces, branches of an uncovered thuja may break off. Such a wound in the spring will turn into a fungal or bacterial disease.
When and how you can cover the thuja for the winter
They begin to shelter plants in the southern regions in November. In the northern regions, the dates may move closer to summer. For thuja for the winter, it is better to use a non-woven covering material. The main purpose of the shelter is to protect the thuja from the sun in winter. Sometimes there are tips to cover small trees with improvised means: PET bottles. Such a shelter will protect the thuja from snow, but it may well "fry". Both glass and transparent plastic are good at transmitting infrared radiation. The temperature inside such a bottle will be very high if the shelter is not covered with snow. Instead of "sleeping" in winter, thuja can grow.
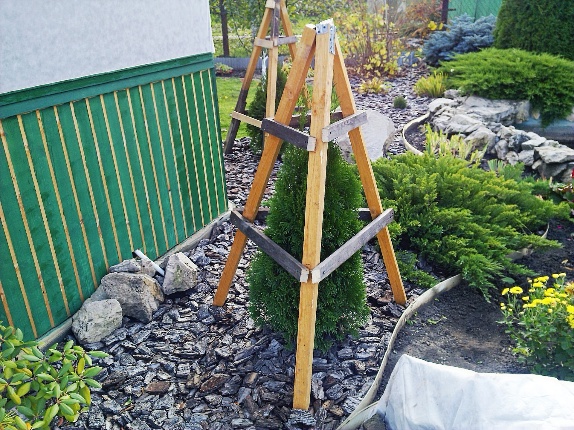
For low thuja, you can make a cover on a rigid base for the winter. The base is wrapped on the outside with any suitable covering material. Burlap or modern plastic sugar or flour bags will do.
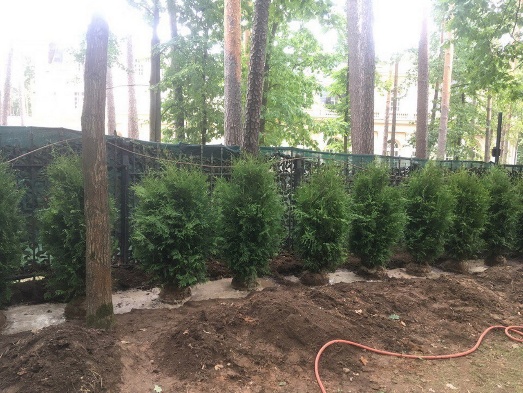
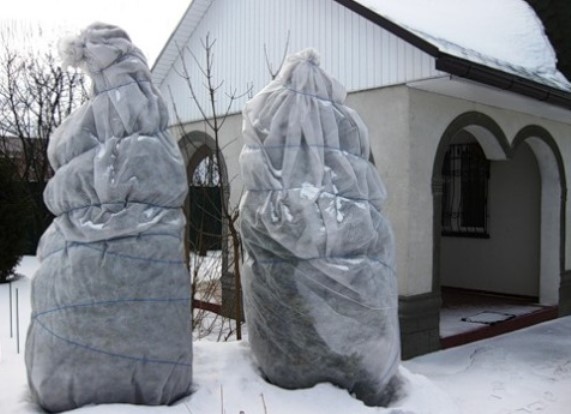
For tall thujas, such a frame is inconvenient. It is difficult to install and has nowhere to store. Usually tall thujas are simply wrapped with a covering material. One of the ways to cover the thuja for the winter is shown in the photo. Polyethylene was used. But the disadvantage of the film is that it does not allow air to pass through, and when heated in the sun, moisture condenses on the walls inside the cocoon. In winter, when it cools, the water freezes. But this principle is quite suitable if you use burlap.
What to do with thuja in winter
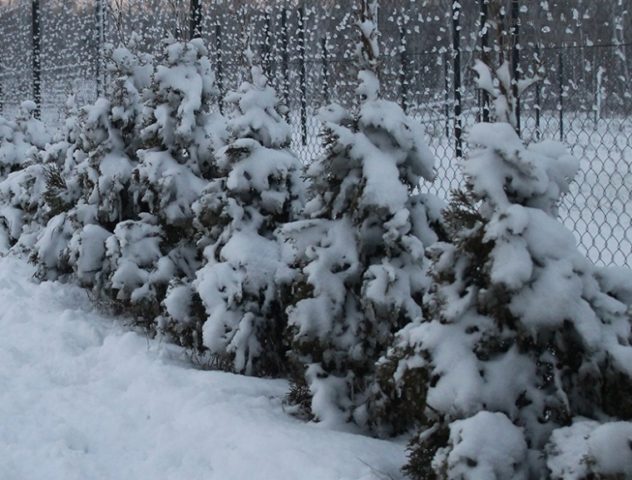
It is unlikely that in winter you can do something with thuja, especially wrapped up during hibernation. Even evergreen trees slow down the metabolism in winter. Only if it was decided not to close the thuja for the winter, as in the photo, will it be necessary to inspect the trees after each heavy snowfall.
Branches, unable to withstand the weight of the snow, can sometimes break off. In this case, it makes sense to try to root the cutting. It will not be worse.
How to plant a thuja shoot in winter
Strictly speaking, no way. If, suddenly, under the weight of the snow, the shoot breaks off, it will have to be germinated at home. But the chances that the stalk will take root are negligible: a piece of thuja roughly pulled out of hibernation is unlikely to give roots.Cuttings and under normal conditions take root in about 50% of cases.
A seedling with an earthen clod can be planted in winter. Wintering in a pit is even preferable to a pot. Planting rules are the same as in the fall. If you are not too lazy to hammer the frozen ground, digging a hole and then, without fail, insulate the root system of the thuja and the tree itself. Or is it easier to wait for spring.
How to care for thujas after winter
Caring for thujas after winter is no more difficult than for other trees. Provided that the tree was not damaged during the winter. Covering material is removed from the thuja, the tree is examined and, if necessary, sanitary pruning is carried out. There is a 95% chance that sanitary pruning will be required. For a faster awakening of the plant from hibernation, it is watered with a warm solution of complex fertilizer.
When to open thuja after winter
In the spring, the covering material is removed from the thuja, depending on the climate of the region. You should not rush and remove the shelter from the thuja already in March. Astrological spring comes only on March 21, and the real one may come later.
In most Russian regions, thuja can be opened in late April or mid-May. It is undesirable to open the whole tree at once. Thuja, unaccustomed to the sun, can get sick. Therefore, the tree is opened in parts so that it can adapt to the sun's rays. If you want to open the whole tree at once, it should be done on a cloudy day.
What to do if thuja turns black after winter
Thuja needles turn black in two cases: as a result of exposure to animal urine and fungal disease. After winter, blackening is most likely due to fungal infection. Provided that the thuja was covered.
If the plant hibernated without shelter, then the blackening can be associated with animals. The observant owner of the site will notice a yellow trail on the snow even in winter. And in this case, the needles can begin to turn black even in winter.
The difference between fungal infection and damage due to excrement is that the needles first turn yellow when sick. Blackness appears in the center of the affected areas.
If the needles turn black due to exposure to animal urine, a large black spot without yellow patches forms on the plant.
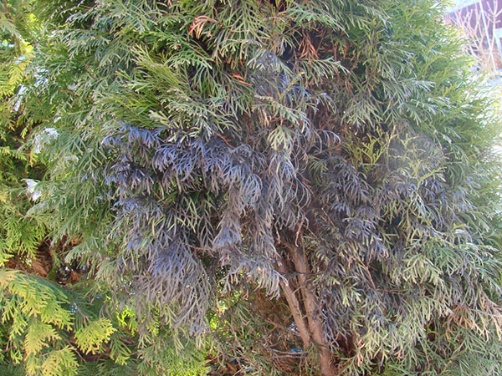
In any case, the needles will no longer recover. The affected areas must be removed. After that, to protect against animals, they erect a fence (it will not help from the cat) and use deterrent substances. Usually these are pungent-smelling and slowly eroding preparations. Any commercially available fungicide can be used to treat fungal diseases.
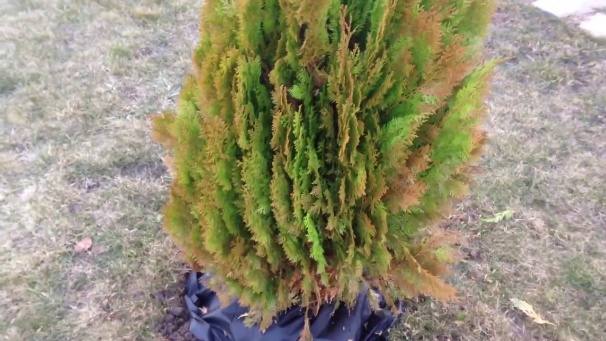
What to do if thuja dries after winter
The yellowing of the needles does not always mean that the whole plant is drying out. The simplest reason why needles can turn yellow after winter is sunburn. The affected areas are excised. Often the whole tree turns yellow if you immediately remove the covering material on a sunny day.
There may also be more serious reasons:
- planting thuja in sandy or clay soil;
- landing in an area with a high groundwater level;
- deepening or exposure of the root collar;
- too much fertilizer applied;
- damage by tree fungi.
If the roots of a thuja are infected with fungi belonging to the genus Phytophthora or Fusarium, the needles first acquire a gray tint, become lethargic and subsequently dry out.
Planting flaws can be corrected by digging out and planting it in another place. When exposing or deepening the root collar, it is enough to add or remove soil. But if the plant is infected with fungi, it can only be dug up and burned. It is better to shed the soil in this place with a fungicidal preparation.
Conclusion
The technology of planting thuja in the fall with a step-by-step description is equally applicable to almost any tree that the gardener is going to plant on the site. The only difference is the planting of cuttings directly into the soil. But this method is not very common due to the very low survival rate of cuttings with such a planting.


