Content
Bee hives have to be moved periodically. It is impossible to do this manually: the bee dwelling, although not so heavy, is rather large and relatively fragile. In addition, transporting the hive should not disturb its inhabitants. Apilift is a special device designed for this kind of transport.
What is apilift and what is it for
Transporting a hive is not an easy task. Since the movement of the structure is carried out together with the inhabitants, then such transportation has to be performed in compliance with many requirements:
- the trolley for transporting hives must first of all have sufficient carrying capacity to move the bee dwelling;
- a prerequisite for the transportation of the apiary is the minimum mechanical impact, the apilift must guarantee the minimum shaking and the softest possible rise of the hive;
- the greatest danger during transportation of the hive is the threat of the honeycomb collapse, while not only the structure is destroyed, but insects also die, all the internal elements of the hive must be secured before transportation, the same applies to external parts, if they cannot be disassembled beforehand, an elevator for more reliable work equipped with special clamps;
- ventilation of the hive is extremely important: this way it is possible to avoid overheating, the cart must provide normal ventilation, not be sealed.
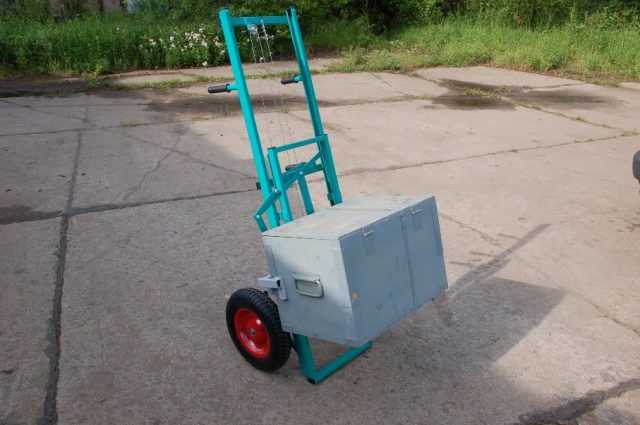
The principle of operation is as follows: the cart is brought close to the hive, the level of the bracket is adjusted so that it corresponds to the position of the body. Then the hive is loaded onto the apilift with a winch, secured and transported to another apiary.
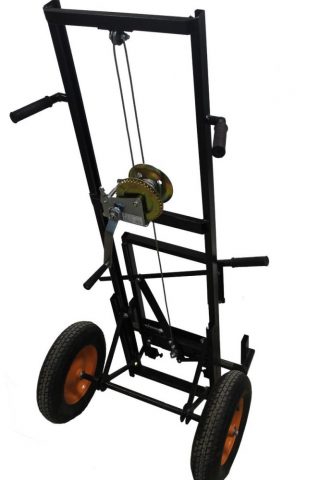
Apiary cart design
The beehive transport trolley is a steel structure including a mobile part, a lifting block and a body fixing device. Any version of the lift has the following elements:
- static metal frame - the basis of the structure, to which the rest of the parts are fixed;
- 2 wheels mounted on an axle - the diameter of the latter depends on the dimensions and weight of the hive;
- a movable frame on which the hive is installed, as a rule, there are side clamps here to prevent the cargo from tipping over during transportation;
- lifting block - a complex part of the lift, includes several blocks and levers that allow you to lift the hives;
- brackets - fixing devices;
- forks - supporting devices for lifting the hive, as a rule, they are removable to facilitate storage of the cart;
- clamps - the apilift is equipped with adjustable devices, this ensures reliable fixation of hives of different sizes, in addition, this allows you to use the cart for transporting other large items, like cans, barrels.
Manufactured models are usually designed to carry loads of up to 150 kg. Do-it-yourself apilifts are not as heavy-duty. But hand-made production takes into account the individual characteristics of the beekeeper and bee hives.
How to make a do-it-yourself hive cart
A ready-made hive lift is quite expensive.It is quite possible to assemble the structure yourself if you have the necessary parts. But it should be borne in mind that to assemble the trolley, you need to be able to handle the welding machine.
Required materials and tools
To make an apilift for beekeepers, you need to stock up on the following materials and tools:
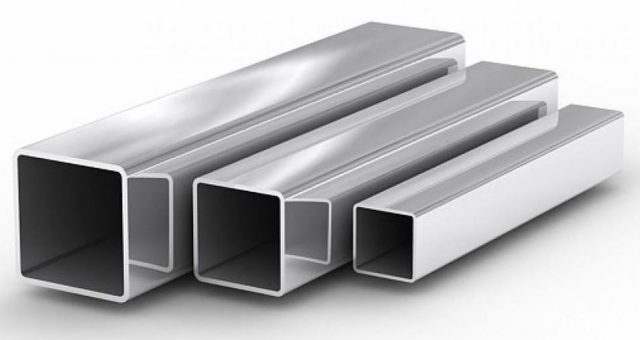
- steel pipes with dimensions of 40 * 20, 30 * 20, 25 * 25 mm, it is preferable to choose galvanized products;

- a rope for a lifting device;
- forks - you can buy ready-made, as well as brackets;

- nuts and bolts M8 and M6;

- wheels of the corresponding diameter;

- springs and rollers on bearings;

- handles with anti-slip rubber or rubber coating, but can be dispensed with.

From the tools you will need a measuring tape, a key and, of course, a welding machine. Threaded connection is not used in the manufacture of apilift.
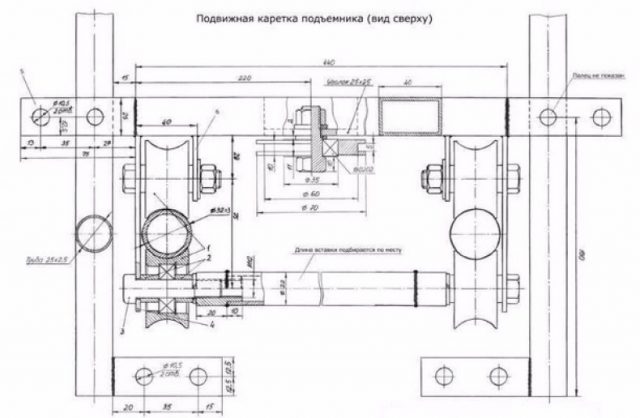
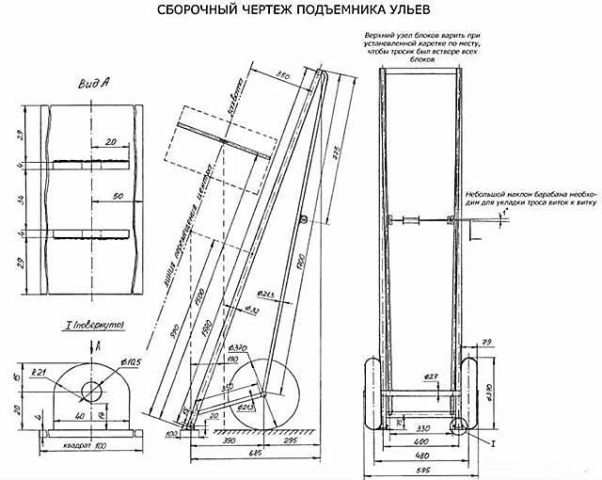
DIY apiary cart (apilift): dimensional drawings
The design of the hive cart itself is relatively simple: a support frame, a block with wheels and a pitchfork. But what is really difficult is the lift. Drawings for making a do-it-yourself hive cart, in fact, are a diagram of the assembly of the lift.
DIY step-by-step assembly of apilift
The procedure for constructing a cart for do-it-yourself beekeepers in general includes the following steps.
- Source preparation: processing, if necessary, and cutting metal pipes to size. Assembly of side posts, main frame and block frame by welding.
- Construction of the lifting block for the hive and preparation for installation.
- Frame mounting forks, brackets, lift, wheels and handles.
- Checking the product for readiness for operation - transportation of an empty hive.
Assembly order may vary. In addition, different models may require additional parts to be installed.
Frame making
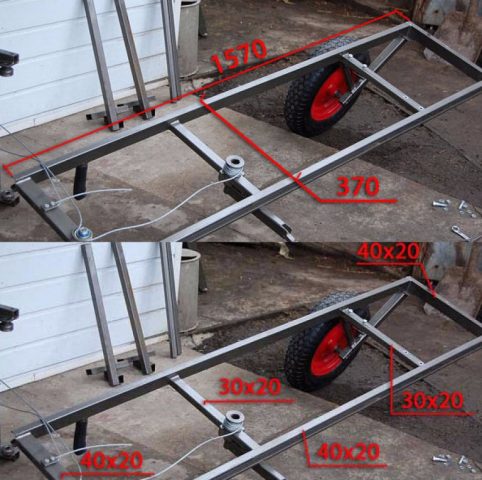
Do-it-yourself assembly of the apilift according to the drawing begins with the frame. Firstly, this is the base of the structure, and secondly, the element that is easiest to manufacture. Profile pipes are used for the frame. For a standard design with a carrying capacity of up to 120 kg, pipes with a cross section of 40 * 20 mm are sufficient.
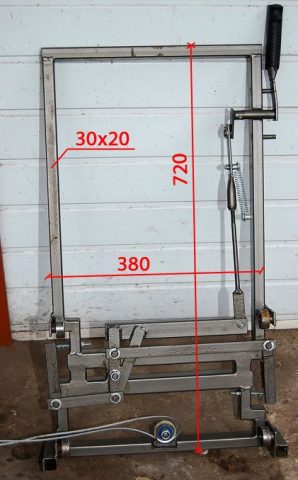
The pipes are cut according to the dimensions of the trolley - 1570 by 370 mm, as a rule. The parts are connected to each other so that right angles are maintained and welded. In this case, the upper transverse beam is welded vertically, and the lower one - flat.
From the outside of both racks of the lift, a cut is made with a width of 20 mm. The bearing axes will be displaced along it.
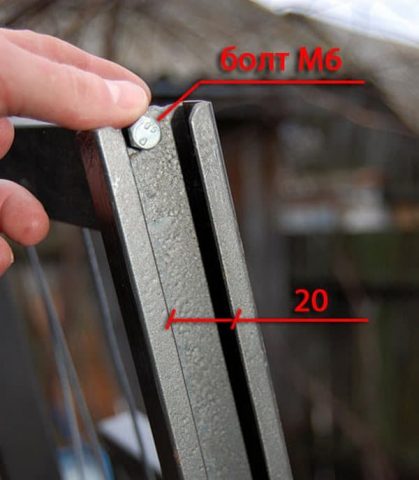
M6 bolts are screwed in on the upper part of the racks - they serve as stops and prevent accidental exit of the carriage beyond the boundaries of the rack. Having stepped back from the top of the rack 20 cm, the handles for the apiary cart are welded.
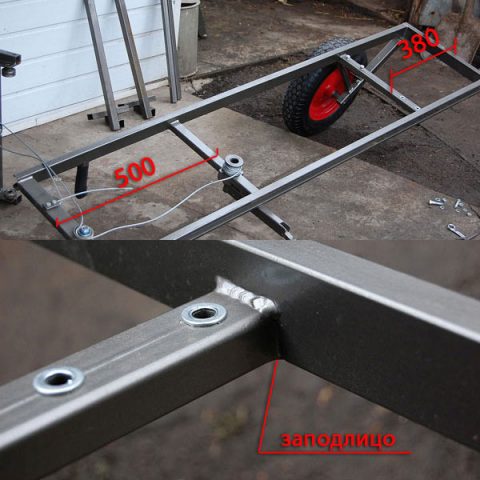
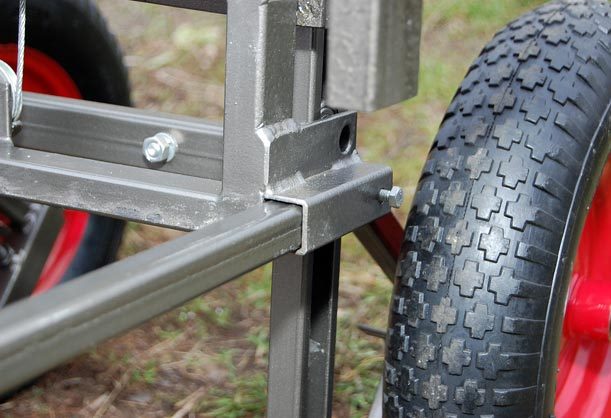
The apilift is reinforced with two additional cross-pieces from the pipeline with a cross section of 30 * 20 mm: the lower one is fixed at a distance of 500 mm from the bottom of the frame, the upper one - 380 mm from the upper one. In the lower crossbar of the hive carriage, holes are drilled for the M8 bolt: here the brackets are attached.
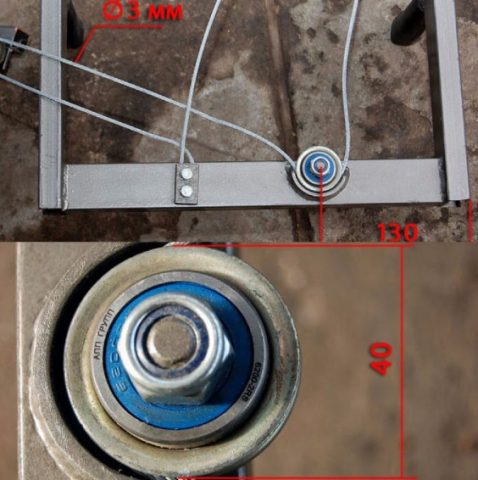
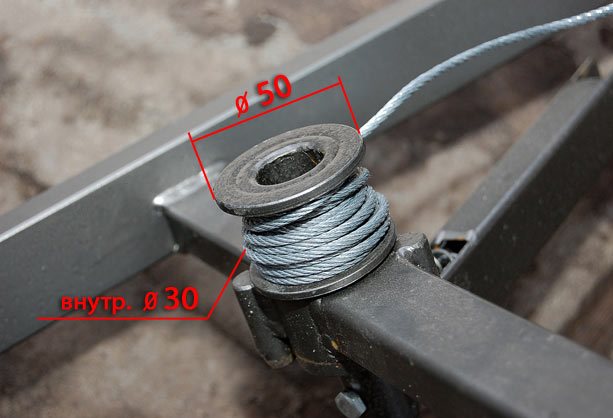
A roller with a bearing is rigidly fixed at the top of the frame on the front side - it acts as a lifting block. A semicircular side is welded along the edge of the roller, which does not allow the cable to spontaneously fall off. Distance from roller to frame edge 130 mm. A cable with a diameter of 3 mm enters the roller. At the same distance, plates with bolts are fixed on the other side, where the free end is fixed.
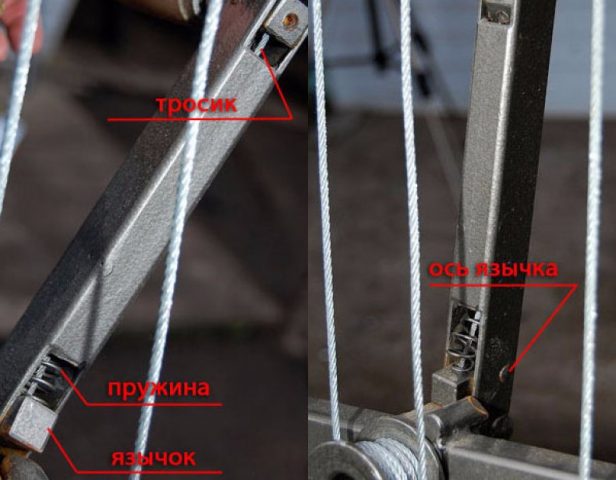
On the second lower cross-member of the lift, at a distance of 120 mm from the edge, a coil with a height of 35 mm is welded to wind the cable. Its axis is installed in the bearing, and a lever equipped with a handle is attached from the back.
The handle is spring-loaded: the steel tongue abuts against the stopper in a free state - a rod fixed next to the reel.
Assembling the lifting unit
This is the most critical part of the hive cart. The unit will require its own frame, welded from thinner and lighter pipes and 4 bearings.
Pipes with a cross section of 30 * 20 mm are cut to size - 1720 by 380 mm and welded. The two lower crossbars are made of pipes 30 * 30 mm, side clamps are also included here. In the center of the lowest cross member, a coil is welded, similar to that located on the top of the main frame of the bogie.
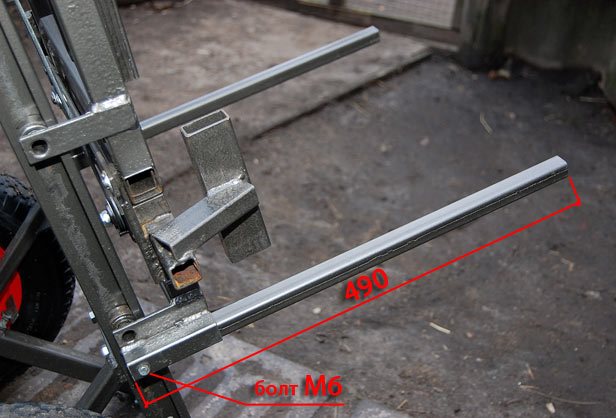
The lift carriage moves on 4 bearings. For the latter, brackets are made from a tire of 3 mm. The bearings must move freely in the tubes of the side struts of the bogie. Pieces of profile pipes with a cross section of 25 * 25 mm are welded onto the lower brackets - here the fork parts are inserted.
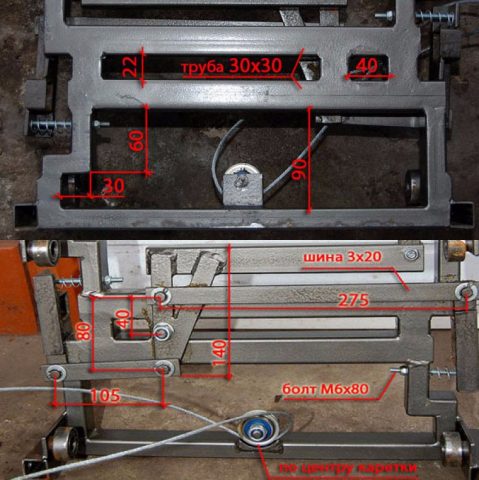
Hinges for side clamps are made. To adjust the angle of inclination, spring-loaded bolts are used: the more the hinge is inclined, the higher the gripping force. The clamps should slide easily through the hinges into the pipes. When it is required to fix the hive on the apilift trolley, the clamps are brought close to the body and clamped. Forks are inserted into the carriage so that the hive can be placed. Fork length not less than 490 mm.
The squeeze mechanism is activated by a pull rod. In the drawings of the apilift, the design of the device is described in more detail.
Assembly of the movement mechanism
This part of the hive cart is the simplest. The main thing is to choose the right wheel diameter.
The axle with the bearing is inserted into the wheel. From the outside, the axis is fixed with a nut, from the inside to the axis, a pipe with a length of 290 mm is welded.
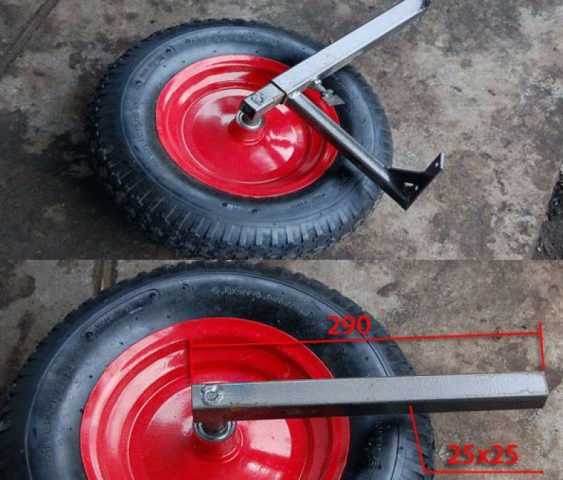
The bracket is welded - 2 pipes with a section of 30 * 30 mm at a right angle. At their ends, plates are welded to fix them on the frame.
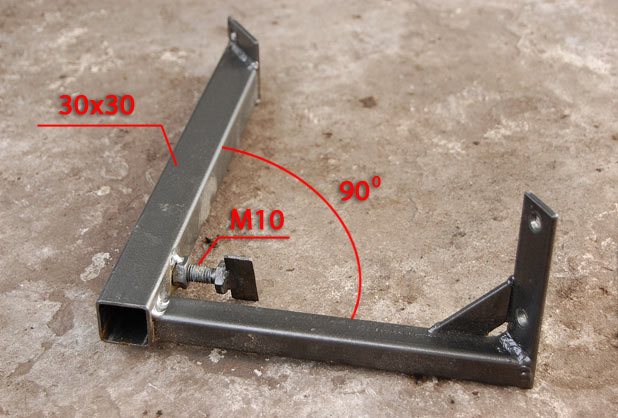
The wheels are displaced relative to the bracket, thereby adjusting the angle of inclination of the hive lift.
Conclusion
Apilift is an extremely useful device not only for an apiary, but also for an ordinary country house. In addition to hives, it can carry very large barrels and cans, and other weights. Its design is not too simple, however, if you know how to use a welding machine, you can make an apilift yourself.


